Typst 的一些好用的包#
Typst 是一门比较新的排版语言,编译快、语法干净,写笔记和讲义都很顺手。 但它内置的能力只覆盖「通用排版」这一层,画自动机、排伪代码、做幻灯片这些专门需求 得靠社区包(Universe)来补。
下面这些是我实际用过的。每个包都配了一张渲染出来的效果图和一段能直接编译的最小源码—— 图不是截图,是用 typst compile 从源码真编出来的,源文件都在 typst-demos/ 里, 改完跑一下 scripts/render-typst-demos.ps1 就能重新生成。
速查#
| 包 | 干什么 |
|---|---|
finite | 画有限自动机的状态转移图 |
syntree | 画句法树 / 语法树 |
timeliney | 画甘特图、时间线 |
gentle-clues | 开箱即用的语义提示框 |
showybox | 自由定制的彩色盒子 |
lovelace | 伪代码(最轻) |
algorithmic | 伪代码(仿 algorithmicx) |
algo | 伪代码(结构最重) |
touying | 做幻灯片 |
wrap-it | 文字绕排图片 |
zebraw | 带行号、语言标识的代码块 |
conch | 渲染终端会话 |
画图#
finite · 画自动机#
一句话概括:给它一张状态转移表,它给你画出一张能直接放进讲义的状态图。 起始状态、接受状态、转移边上的标签都能标,布局可以自动也可以手工给坐标。
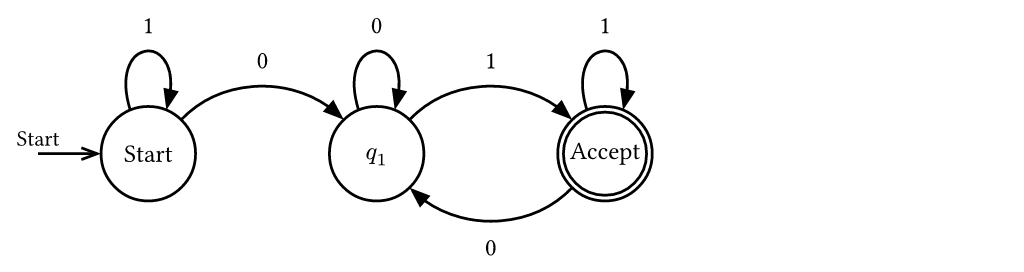 一个接受「以 01 结尾的二进制串」的 DFA,由
 typst-demos/finite.typ 编译得到
写理论计算机科学的作业时特别省事——不用再拿 draw.io 手拖箭头, 状态一多也不会画歪,改一个转移只改一行代码。 底层用的是 cetz,所以画出来的线条质量不错。
源码
#set page(width: 13cm, height: auto, margin: 6pt, fill: white)
#set text(font: ("Libertinus Serif", "Noto Sans SC"), size: 9pt)

// finite 0.5.1:用状态转移表描述有限自动机,自动生成状态图。
// 该 DFA 接受以 "01" 结尾的二进制串:q0 为起始状态,q1 与 q2 带自环。
#import "@preview/finite:0.5.1": automaton

#automaton(
  (
    q0: (q0: "1", q1: "0"),
    q1: (q1: "0", q2: "1"),
    q2: (q1: "0", q2: "1"),
  ),
  initial: "q0",
  final: "q2",
  labels: (q0: [Start], q1: [$q_1$], q2: [Accept]),
  layout: (q0: (0, 0), q1: (2.9, 0), q2: (5.8, 0)),
)
syntree · 画句法树#
用中括号嵌套描述树的结构,第一层包一层,比手写坐标直观得多。 节点标签加 ^ 前缀会渲染成不带横线的三角形,这是语言学里画短语结构树的惯例画法。

The cat sat on the mat 的短语结构树,由 typst-demos/syntree.typ 编译得到
源码
#set page(width: 13cm, height: auto, margin: 6pt, fill: white)
#set text(font: ("Libertinus Serif", "Noto Sans SC"), size: 9pt)

// syntree 0.3.1:用中括号嵌套语法画短语结构树。
// 第一个词是节点标签,其余内容是终端词;标签加 ^ 前缀表示无横线的三角形节点。
#import "@preview/syntree:0.3.1": syntree

#figure(
  gap: 0.5em,
  caption: [短语结构树示例],
  syntree(
    nonterminal: (style: "italic"),
    terminal: (fill: rgb("#1f4e79")),
    child-spacing: 1.2em,
    layer-spacing: 1.8em,
  )[
    [S
      [NP [Det The] [N cat]]
      [VP
        [V sat]
        [^PP on the mat]
      ]
    ]
  ],
)
timeliney · 画甘特图#
日程表、项目排期用这个。headerline 定义时间刻度(可以分层,比如「年份 + 月份」), taskgroup / task 排任务条,milestone 插里程碑。
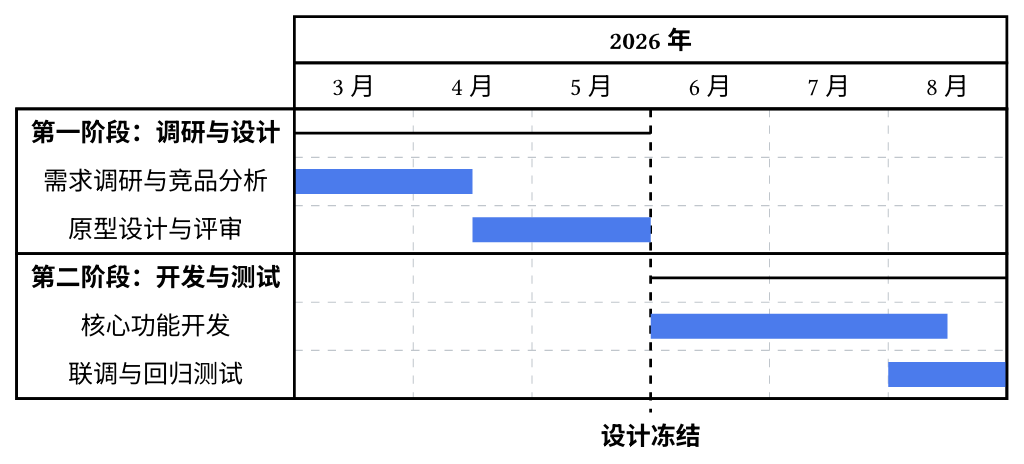 一份 6 个月的项目排期,由
 typst-demos/timeliney.typ 编译得到
和用表格硬拼甘特图相比,好处是任务有先后依赖时不用手工对齐格子—— 起止位置直接写数字,刻度改了整个图跟着重排。
源码
#set page(width: 13cm, height: auto, margin: 6pt, fill: white)
#set text(font: ("Libertinus Serif", "Noto Sans SC"), size: 9pt)

// timeliney 0.4.0:用 headerline 定义时间刻度,用 taskgroup / task 排布甘特条。
// 下面是一条 6 个月(2026 年 3—8 月)的排期,任务名用中文。
#import "@preview/timeliney:0.4.0"

#timeliney.timeline(
  show-grid: true,
  grid-style: (stroke: (dash: "dashed", thickness: 0.4pt, paint: rgb("#c0c6cc"))),
  line-style: (stroke: 9pt + rgb("#4b7bec")),
  {
    import timeliney: *

    headerline(group(([*2026 年*], 6)))
    headerline(group(..range(3, 9).map(m => [#m 月])))

    taskgroup(title: [*第一阶段:调研与设计*], {
      task("需求调研与竞品分析", (0, 1.5))
      task("原型设计与评审", (1.5, 3))
    })

    taskgroup(title: [*第二阶段:开发与测试*], {
      task("核心功能开发", (3, 5.5))
      task("联调与回归测试", (5, 6))
    })

    milestone(
      at: 3,
      style: (stroke: (dash: "dashed")),
      align(center, [*设计冻结*]),
    )
  },
)
提示框与盒子#
这两个经常被拿来比,其实定位不一样:gentle-clues 是语义化的提示框,showybox 是画盒子的原语。
gentle-clues · 开箱即用的提示框#
写一句 #info[...]、#warning[...]、#tip[...] 就完事。 配色、图标、标题文案都是预设好的,标题还会跟着 text(lang) 自动切换语言—— 所以只要写一行 #set text(lang: "zh"),出来的就是「信息 / 警告 / 提示」。
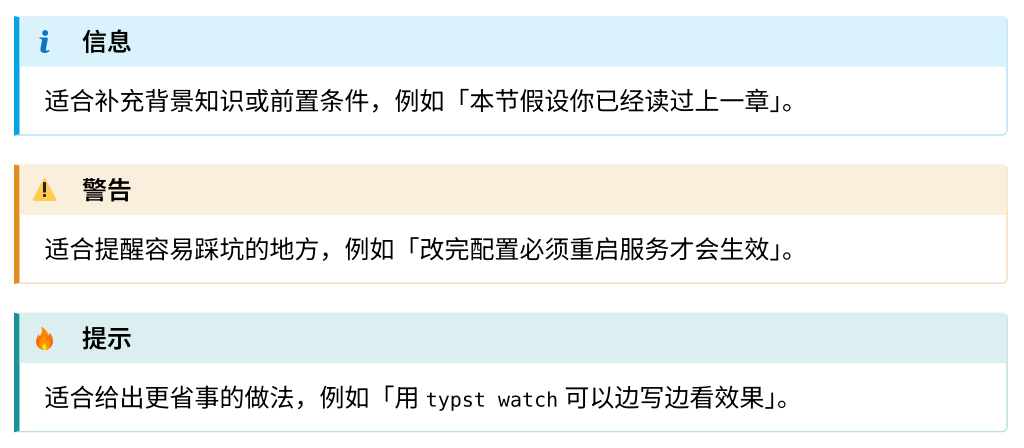 三种最常用的提示框,由
 typst-demos/gentle-clues.typ 编译得到
它一共内置了十几种语义,覆盖得很全:
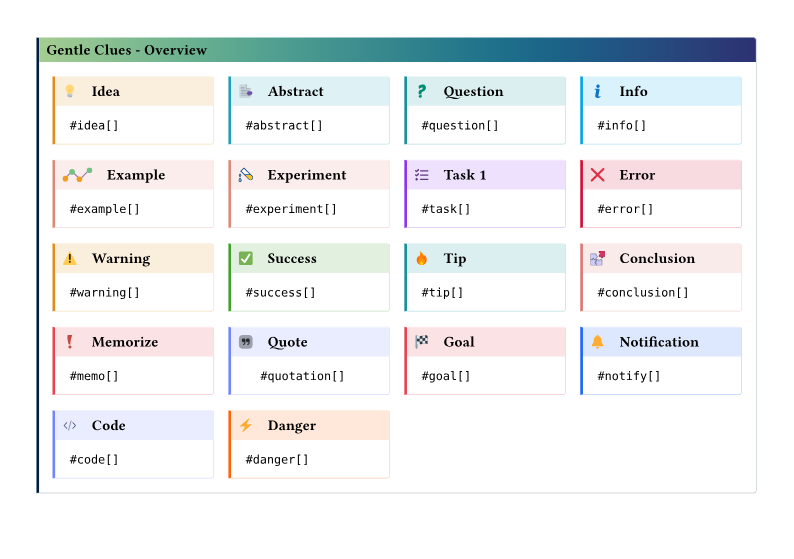 内置的全部提示框类型
适合「写作过程中随手标注」——想到要提醒读者一句,敲四个字符就完事, 不用停下来调样式。
源码
#set page(width: 13cm, height: auto, margin: 6pt, fill: white)
#set text(font: ("Libertinus Serif", "Noto Sans SC"), size: 9pt)
#set text(lang: "zh")

#import "@preview/gentle-clues:1.3.1": info, warning, tip

#info[适合补充背景知识或前置条件,例如「本节假设你已经读过上一章」。]

#warning[适合提醒容易踩坑的地方,例如「改完配置必须重启服务才会生效」。]

#tip[适合给出更省事的做法,例如「用 `typst watch` 可以边写边看效果」。]
showybox · 自由定制的盒子#
showybox 只提供「画盒子」这一件事:标题栏配色、正文底色、边框粗细、圆角、阴影 全部要自己指定。代码比 gentle-clues 长,换来的是完全可控。
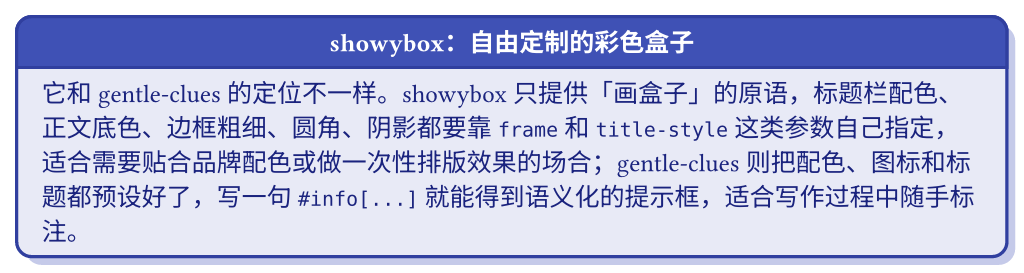 一个自定义配色的盒子,由
 typst-demos/showybox.typ 编译得到
两者的取舍很清楚:
- 要语义(这是一条警告)→ 用 gentle-clues,少写代码,风格统一
- 要外观(就要这个颜色这个圆角)→ 用 showybox,贴合配色方案或做一次性排版效果
源码
#set page(width: 13cm, height: auto, margin: 6pt, fill: white)
#set text(font: ("Libertinus Serif", "Noto Sans SC"), size: 9pt)
#set text(lang: "zh")

#import "@preview/showybox:2.0.4": showybox

#showybox(
  title: "showybox:自由定制的彩色盒子",
  frame: (
    title-color: rgb(63, 81, 181),
    body-color: rgb(232, 234, 246),
    border-color: rgb(48, 63, 159),
    radius: 6pt,
    thickness: 1.2pt,
  ),
  title-style: (color: white, weight: "bold", align: center),
  body-style: (color: rgb(26, 35, 126)),
  shadow: (offset: 3pt, color: rgb(197, 202, 233)),
  [正文……],
)
伪代码#
Typst Universe 上写伪代码的包不止一个。我试了三个,差别主要在两处: 语法有多重,以及默认排出来长什么样。下面三段排的是同一个二分查找, 可以横向比较。
| 包 | 语法 | 默认排版 |
|---|---|---|
lovelace | 最轻:就是一个普通列表,缩进即层级,不提供任何关键字或注释语法 | 素净,没有行号和参考线,关键字要自己加粗 |
algorithmic | 最重:Procedure / While / IfElseChain 这些结构化函数,参数是数组和代码块 | 最像论文,自动编号标题、行号、竖参考线、自动缩进 |
algo | 中等:内容块 + \ 换行 + #i / #d 标记缩进 | 关键字自动加粗,版式紧凑,但缩进要自己标 |
lovelace · 最不预设立场#
它只做一件事:把列表渲染成伪代码的样子。没有 while/if 这种关键字函数, 也没有注释语法——关键字就是你自己的 markup,想让它们变粗就自己加粗。 代价是每行都要自己安排,好处是外观完全可控。
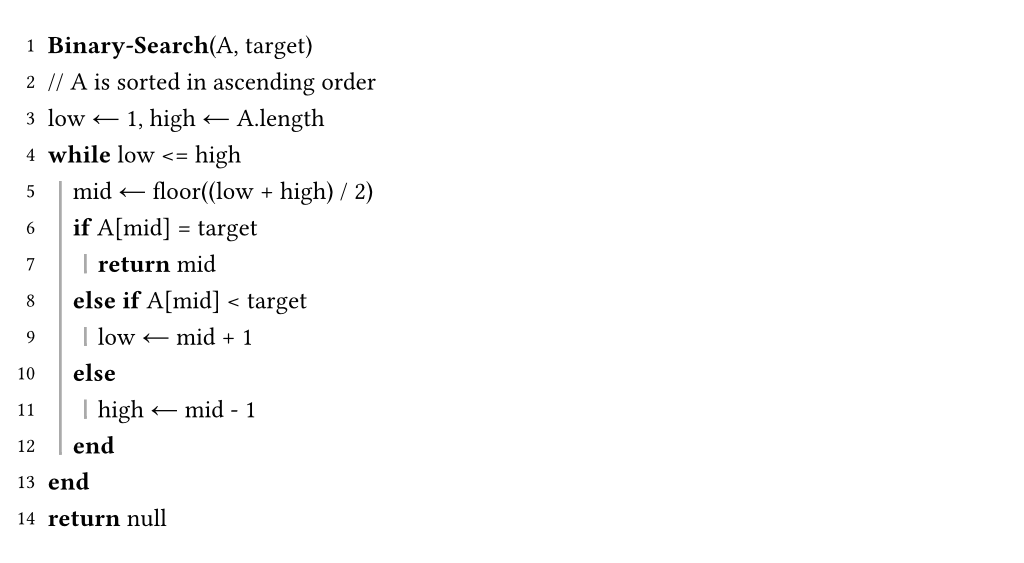 同一段二分查找,由
 typst-demos/lovelace.typ 编译得到
注释要转义
注释在 lovelace 里没有专门语法,直接写就行。但在 Typst 的 markup 模式里 // 是保留的,所以要写成 \/\/。
源码
#set page(width: 13cm, height: auto, margin: 6pt, fill: white)
#set text(font: ("Libertinus Serif", "Noto Sans SC"), size: 9pt)

#import "@preview/lovelace:0.3.1": pseudocode-list

// Lovelace is unopinionated: there is no keyword or comment construct at all.
// Every list item becomes one line, nesting becomes indentation, and keywords
// are just markup you style yourself. "//" must be escaped in markup mode.
#pseudocode-list[
  + *Binary-Search*(A, target)
  + \/\/ A is sorted in ascending order
  + low ← 1, high ← A.length
  + *while* low <= high
    + mid ← floor((low + high) / 2)
    + *if* A[mid] = target
      + *return* mid
    + *else if* A[mid] < target
      + low ← mid + 1
    + *else*
      + high ← mid - 1
    + *end*
  + *end*
  + *return* null
]
algorithmic · 最像论文#
模仿 LaTeX 的 algorithmicx。关键字、缩进、行号、竖参考线全都是自动的, 还会自动加上 Algorithm 1: Binary Search 这样的标题——投论文要的就是这个效果。
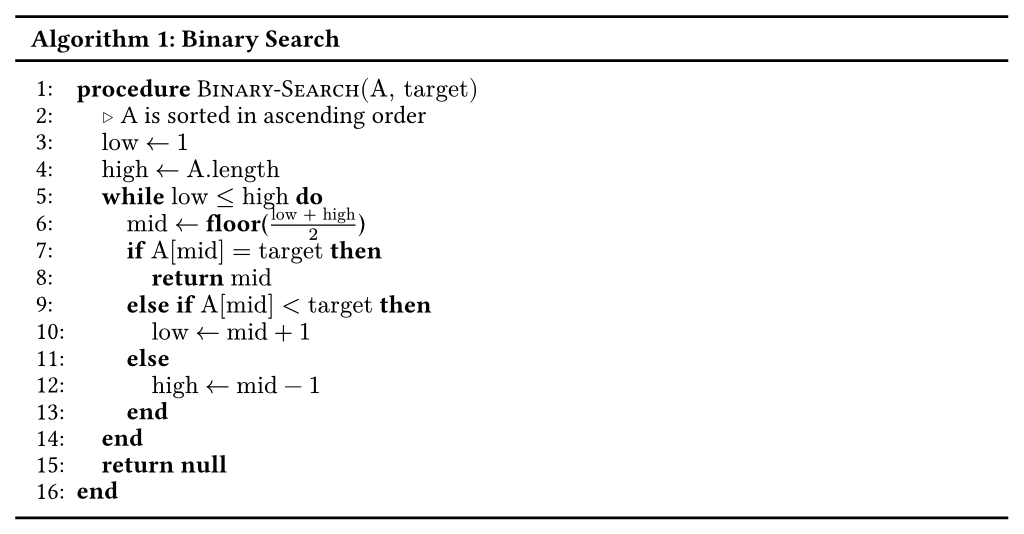 同一段二分查找,由
 typst-demos/algorithmic.typ 编译得到
代价是语法最啰嗦:每个语句都是一个函数调用,条件、正文、分支要分别包在 数组和代码块里,嵌套一深括号就数不清了。适合「一次写对、之后很少改」的场合。
源码
#set page(width: 13cm, height: auto, margin: 6pt, fill: white)
#set text(font: ("Libertinus Serif", "Noto Sans SC"), size: 9pt)

#import "@preview/algorithmic:1.0.7"
#import algorithmic: algorithm-figure, style-algorithm

// The algorithmicx look: fixed `procedure`/`if ... then`/`while ... do`/`end`
// keywords, auto indentation, a vertical guide stroke and line numbers.
#show: style-algorithm

#algorithm-figure("Binary Search", {
  import algorithmic: *
  Procedure("Binary-Search", ("A", "target"), {
    Comment[A is sorted in ascending order]
    Assign[$"low"$][$1$]
    Assign[$"high"$][$"A.length"$]
    While($"low" <= "high"$, {
      Assign($"mid"$, FnInline[floor][$("low" + "high") / 2$])
      IfElseChain(
        $"A"["mid"] = "target"$,
        { Return[$"mid"$] },
        $"A"["mid"] < "target"$,
        { Assign[$"low"$][$"mid" + 1$] },
        Assign[$"high"$][$"mid" - 1$],
      )
    })
    Return[*null*]
  })
})
algo · 折中#
algo 把伪代码当成一个内容块来写:\ 表示换行,#i / #d 表示进入和退出一层缩进, 关键字(while、if、return……)由包自动加粗。
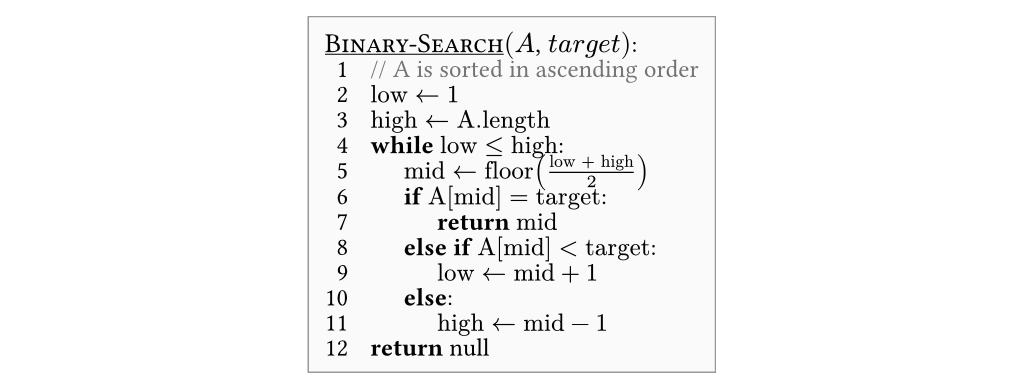 同一段二分查找,由
 typst-demos/algo.typ 编译得到
源码读起来最接近伪代码本身,但缩进得自己数——#i 和 #d 要配对, 漏一个整段就歪了。
源码
#set page(width: 13cm, height: auto, margin: 6pt, fill: white)
#set text(font: ("Libertinus Serif", "Noto Sans SC"), size: 9pt)

#import "@preview/algo:0.3.6": algo, i, d, comment

// Algo typesets a content block: "\" ends a line, #i/#d open and close an
// indent level, keywords are auto-bolded, #comment puts a note on the line.
#algo(
  title: "Binary-Search",
  parameters: ("A", "target"),
  inset: 6pt,
  row-gutter: 3pt,
  column-gutter: 8pt,
  indent-size: 12pt,
  stroke: 0.5pt + luma(60%),
)[
  #comment(inline: true)[A is sorted in ascending order]\
  $"low" <- 1$\
  $"high" <- "A.length"$\
  while $"low" <= "high":#i\
    $"mid" <- "floor"(("low" + "high") / 2)$\
    if $"A"["mid"] = "target":#i\
      return $"mid"$#d\
    else if $"A"["mid"] < "target":#i\
      $"low" <- "mid" + 1$#d\
    else:#i\
      $"high" <- "mid" - 1$#d#d\
  return null
]
同一段算法的可见差别#
把三张图放在一起看,差别集中在四处:
| lovelace | algorithmic | algo | |
|---|---|---|---|
| 外框与题注 | 无 | Algorithm 1: Binary Search | 浅灰圆角盒子 + Binary-Search(A, target): |
| 行号 / 缩进导引 | 只有行号 | 行号 + 竖参考线 | 无行号,靠缩进 |
| 注释 | 纯文本,// 要转义 | ▷ 符号 | 灰色 //,可挂行尾 |
| 数学 | 只能写 <=、floor(...) | 真正的 ≤、分数 | 真正的 ≤、分数 |
| 结束符 | 手写 end | 自动生成 | 靠 #d 关闭 |
怎么选#
- 写论文、要
Algorithm 1标题和行号 → algorithmic - 想少写代码、只要一个能看的结果 → algo
- 想完全控制外观(不要行号、自定义关键字样式) → lovelace
幻灯片#
Touying · 做幻灯片#
用写文档的方式写 slides:== 标题就是一页,版式交给主题统一管, 公式、代码高亮、#alert[...] 增量动画都是内置的,编出来是 16:9 的 PDF。
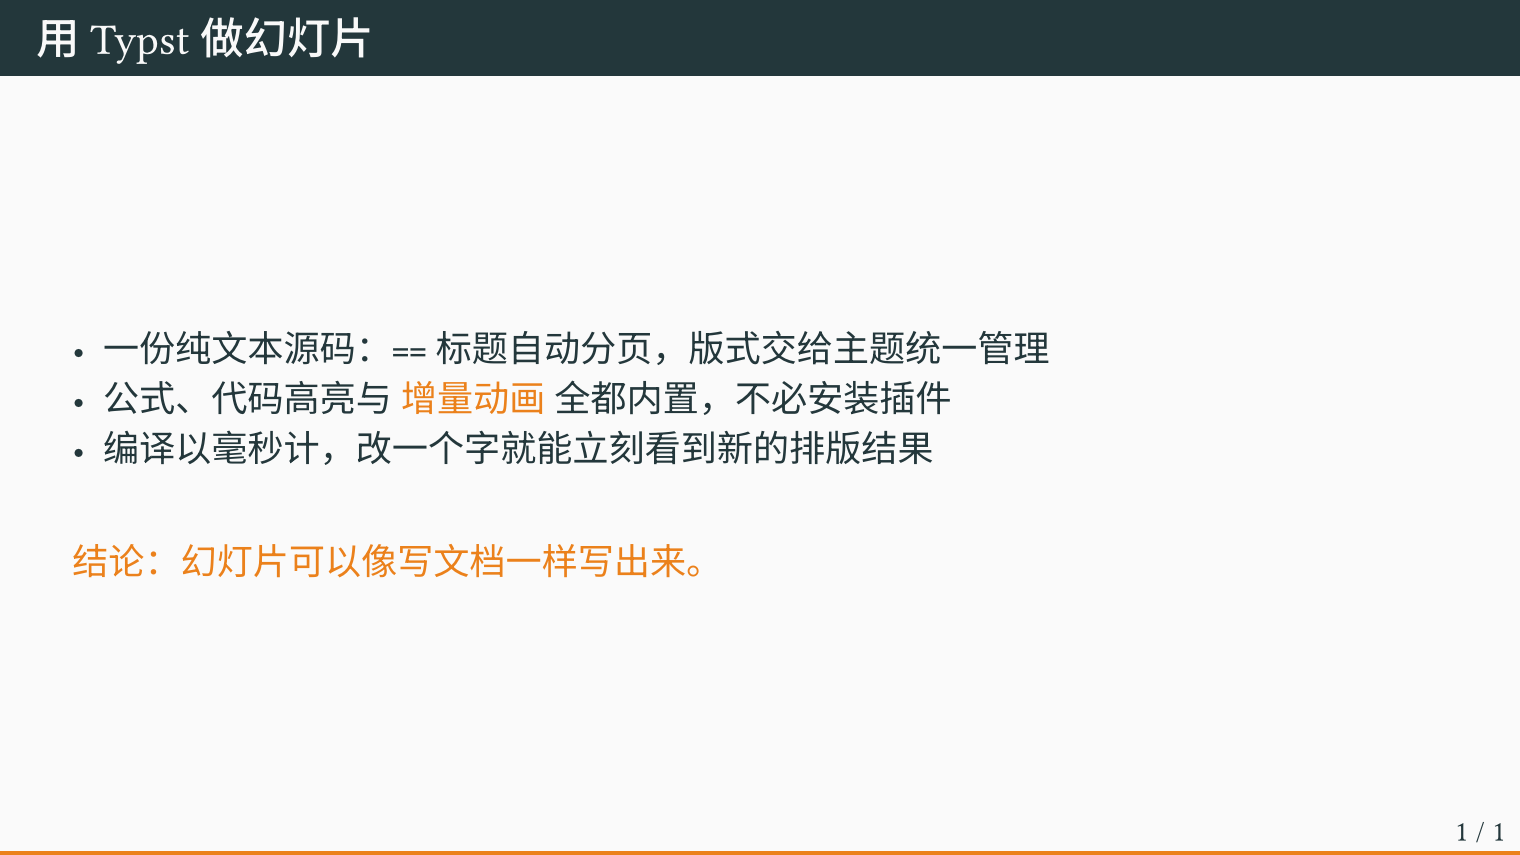 metropolis 主题的一页内容页,由
 typst-demos/touying.typ 编译得到
Touying 是目前 Typst 生态里最成熟的幻灯片方案,自带主题不少, 也支持自定义主题。和 Beamer 比,语法简单得多;和 PowerPoint 比, 好处是整个 deck 是纯文本,能进 git、能 diff、能复用变量。
版本差异很大
Touying 0.8 和 0.6 的 API 不兼容,网上的教程大多还是老写法。 以包内 README 为准:
#import "@preview/touying:0.8.0": *
#import themes.metropolis: *
#show: metropolis-theme.with(aspect-ratio: "16-9")
另外一级标题 = 会额外生成一张章节页,只想要内容页就用二级标题 ==。
源码
#import "@preview/touying:0.8.0": *
#import themes.metropolis: *

#show: metropolis-theme.with(aspect-ratio: "16-9")

#set text(font: ("Libertinus Serif", "Noto Sans SC"), lang: "zh")

== 用 Typst 做幻灯片

- 一份纯文本源码:`==` 标题自动分页,版式交给主题统一管理
- 公式、代码高亮与 #alert[增量动画] 全都内置,不必安装插件
- 编译以毫秒计,改一个字就能立刻看到新的排版结果

#v(1.2em)

#alert[结论:幻灯片可以像写文档一样写出来。]
排版细节#
wrap-it · 文字绕排图片#
Typst 一直没有原生的图文绕排(文字沿着图片边缘流动),wrap-it 补上了这块。 原理是把图形和正文放进同一个网格,让正文在图形之外的列里换行。
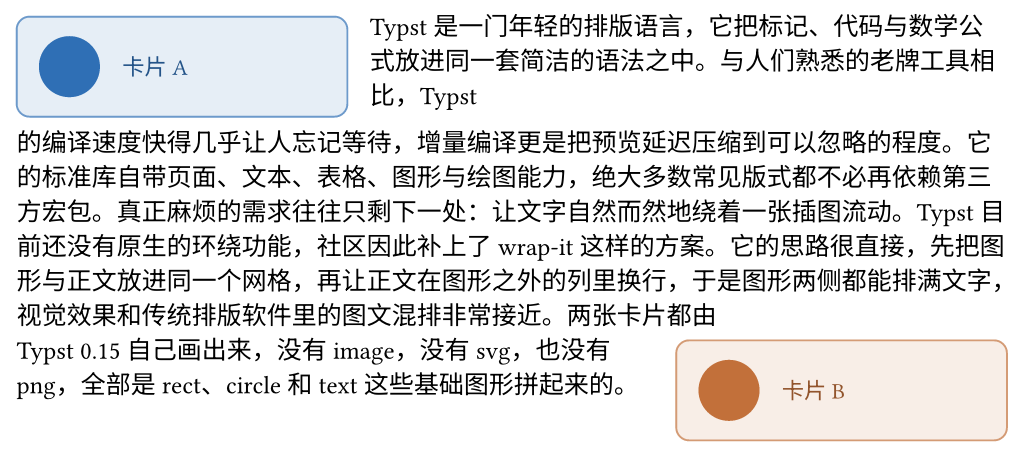 两张卡片分别贴左、贴右,正文绕开它们排,由
 typst-demos/wrap-it.typ 编译得到
用法是 wrap-top-bottom(顶部图形, 底部图形, 正文):上面那个图贴左边, 下面那个贴右边,正文先在第一张图右侧向下排,绕过之后回到整栏宽度, 再绕到第二张图的左侧继续。
wrap-it 对纯中文会静默失效
源码里切分正文用的是 body.text.split(" ")——只认空格。 一整段中文如果只有寥寥几个空格,就等于只有几个「词」, 内部算分割点时直接返回 0 或 -1,函数悄悄落到「不环绕」的分支: 下面那张图不会环绕,而是孤零零掉到正文底下。不报错,只是效果没了。
我这次就踩了:第一版渲染出来卡片 B 挂在页面最下方。 解法是让段尾出现若干用空格分隔的拉丁词(Typst 0.15、image、svg 之类), 尾部词粒度够细,分割点才落得下来。中英混排的文档天然没这个问题。
文字不够长就看不到效果
如果正文比图形矮,环绕根本不会发生,图形下方的空白会把它和正文隔开。 所以演示里的文字是故意写长的——那段说明本身不影响效果,只是为了让绕排看得见。
源码
#set page(width: 13cm, height: auto, margin: 6pt, fill: white)
#set text(font: ("Libertinus Serif", "Noto Sans SC"), size: 9pt)

#import "@preview/wrap-it:0.1.1": wrap-top-bottom

// 被文字环绕的卡片完全由 Typst 绘制,不引用任何外部图片
#let card(tag, tint) = box(
  width: 4.2cm,
  inset: (x: 8pt, y: 7pt),
  radius: 5pt,
  fill: tint.lighten(88%),
  stroke: 0.7pt + tint.lighten(30%),
  grid(
    columns: (auto, 1fr),
    column-gutter: 8pt,
    align: horizon,
    circle(radius: 11pt, fill: tint),
    text(size: 8pt, fill: tint.darken(25%))[#tag],
  ),
)

// 一段连续的中文正文
#let passage = [
  Typst 是一门年轻的排版语言,它把标记、代码与数学公式放进同一套简洁的语法之中。……
  两张卡片都由 Typst 0.15 自己画出来,没有 image,没有 svg,也没有 png,
  全部是 rect、circle 和 text 这些基础图形拼起来的。
]

// 上卡片靠左、下卡片靠右,文字从两张卡片中间穿过
#wrap-top-bottom(
  card([卡片 A], rgb("#2f6fb5")),
  card([卡片 B], rgb("#c2703a")),
  passage,
  top-kwargs: (column-gutter: 0.9em),
  bottom-kwargs: (column-gutter: 0.9em),
)
zebraw · 带行号和语言标识的代码块#
Typst 原生的 raw 代码块没有行号、没有语言标签,也不能高亮某几行。 zebraw 就是来补这些的。
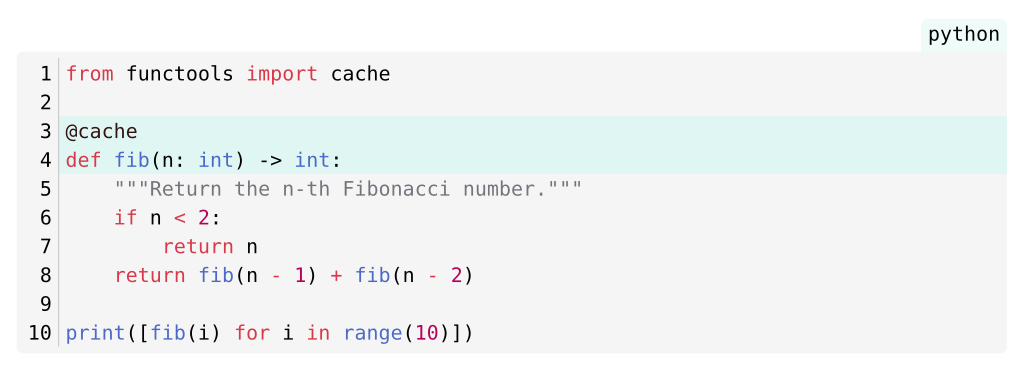 行号 + 右上角语言标识 + 第 3、4 行高亮,由
 typst-demos/zebraw.typ 编译得到
三个开关都在这段里:
#v(1.4em)                       // 给语言标签留出上边距,见下面的坑

#zebraw(
  lang: true,                    // 右上角显示语言名
  numbering-separator: true,     // 行号和代码之间加一条竖线
  highlight-lines: (3, 4),       // 高亮指定行
  code,                          // 注意 body 是最后一个参数,位置传参即可
)
语言标签画在代码块上边缘之外
源码里用 v(-measure(lang-tab).height) 把标签往上挪,所以它会跑到代码块的 边界以外。页面边距小的时候(比如 6pt)会被直接裁掉半个字。 在 #zebraw() 前面加一段 #v(1.4em) 就好。
包里有中文文档(README_zh.md,20 KB),参数说明比英文版还全。
源码
#set page(width: 13cm, height: auto, margin: 6pt, fill: white)
#set text(font: ("Libertinus Serif", "Noto Sans SC"), size: 9pt)

#import "@preview/zebraw:0.6.3": zebraw

#let code = ```python
from functools import cache

@cache
def fib(n: int) -> int:
    """Return the n-th Fibonacci number."""
    if n < 2:
        return n
    return fib(n - 1) + fib(n - 2)

print([fib(i) for i in range(10)])
// 语言标签绘制在代码块上边缘之上,留出这一段空白避免被页面裁掉
v(1.4em)#
zebraw(#
lang: true, numbering-separator: true, highlight-lines: (3, 4), code, ) ```
终端#
conch · 把终端会话写成代码#
conch 解决的是「怎么在文档里放一段终端输出」这件事。 传统做法是截图,缺点很明显:改一个字就要重新截,图片还不能进 git diff。
conch 让你直接写命令,它在一个虚拟文件系统里真的执行,然后把带配色和语法高亮的 终端窗口渲染出来。改哪条命令就改哪一行代码,重新编译即可。
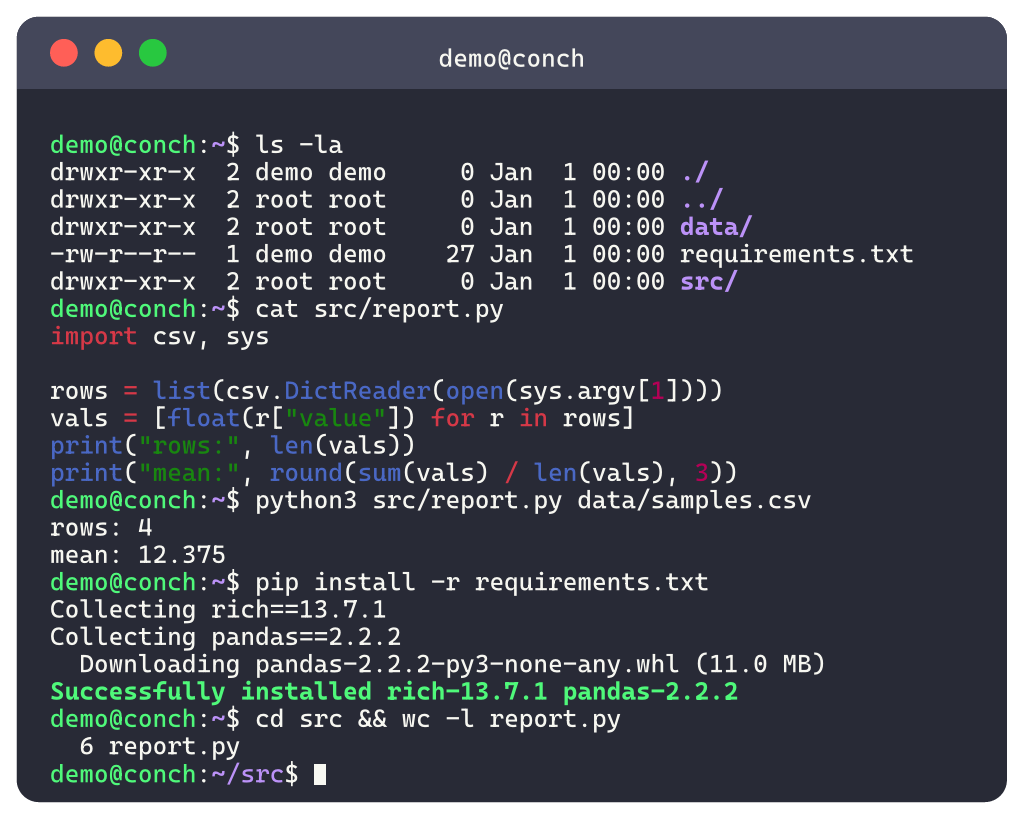 一段完整的会话:列目录、看脚本、跑脚本、装依赖,由
 typst-demos/conch.typ 编译得到
演示里的几个细节值得一提:
python3 src/report.py data/samples.csv输出的mean: 12.375, 是照着虚拟文件系统里data/samples.csv的内容现算出来的,不是写死的字符串pip install -r requirements.txt里的Collecting rich==13.7.1来自虚拟的requirements.txt- 最后一条
cd src之后,提示符从demo@conch:~$变成了demo@conch:~/src$
也就是说这段「终端画面」和真实运行是自洽的。内置命令表之外的工具, 可以用 Typst 函数注册插件补上(上面两个就是这么做的)。
终端正文里每一行都会被当成命令
所以画面内只能写英文——写中文会报 command not found。 中文说明放在源码注释里。
源码
#import "@preview/conch:0.1.0": system, terminal-block

#let python3(args, stdin, files) = {
  let script = args.at(0, default: "")
  let data = if args.len() > 1 { files.at(args.at(1), default: "") } else { "" }
  if script not in files or data == "" {
    return (
      stdout: "python3: can't open file '" + script + "': [Errno 2] No such file or directory\n",
      exit-code: 2,
    )
  }
  let s = stats(data)
  (stdout: "rows: " + str(s.n) + "\nmean: " + str(s.mean) + "\n", exit-code: 0)
}

#terminal-block(
  system: system(
    hostname: "conch",
    files: (
      "requirements.txt": requirements,
      "data/samples.csv": samples,
      "src/report.py": report-py,
    ),
    plugins: (("python3", python3), ("pip", pip)),
  ),
  user: "demo",
  theme: "dracula",
  font: (font: ("Cascadia Mono", "DejaVu Sans Mono"), size: 9pt),
  width: 100%,
)[```
ls -la
cat src/report.py
python3 src/report.py data/samples.csv
pip install -r requirements.txt
cd src && wc -l report.py
```]
这些示例怎么跑#
所有示例都是独立可编译的,放在仓库的 typst-demos/ 下。全部重新渲染:
脚本会逐个 typst compile --format png --ppi 200,输出到 docs/assets/typst/, 本页引用的就是那些图。首次运行会自动从 Typst Universe 下载用到的包。
加一个新包的演示:在 typst-demos/ 里新建一个 .typ,跑脚本,再在本页加一段。